Store address and hours
location_on 4131 Fraser St. Vancouver BC Get Directions
phone 604-875-1993 Call us
access_time Hours
Monday - Friday | 9AM - 5:30PM |
Saturday - Sunday & Holidays | Closed | See Holiday Hours |

-
close
-
CATEGORIES
-
-
-
-
-
-
-
-
-
-
-
-
-
Featured Items
-
-
-
-
-
-
-
More mirco-controllers
-
More Developement Tools
-
-
More Prototyping
-
More Modules
-
-
Featured Items
-
More prototyping Tools
-
-
-
-
-
-
-
-
Featured Item
-
-
-
-
-
-
-
Featured Items
-
-
-
-
-
-
-
-
Featured Items
-
-
-
-
-
-
-
-
-
-
-
-
-
Featured Items
-
-
-
-
-
-
-
-
-
Featured Items
-
-
-
-
-
-
Popular Cleaners
-
-
-
Featured Items
-
-
-
-
-
-
-
Featured Items
-
-
-
-
-
Featured Items
-
-
-
-
Featured Products
-
-
-
-
-
more motor
-
-
more power supplies
-
-
Featured Items
-
-
-
more electrical devices
-
-
-
-
-
-
-
Featured Items
-
-
-
-
-
-
BRANDS
-
- PROJECTS
-
COMMUNITY
-
-
-
FEATURED POSTS
-
-
-
- SALE
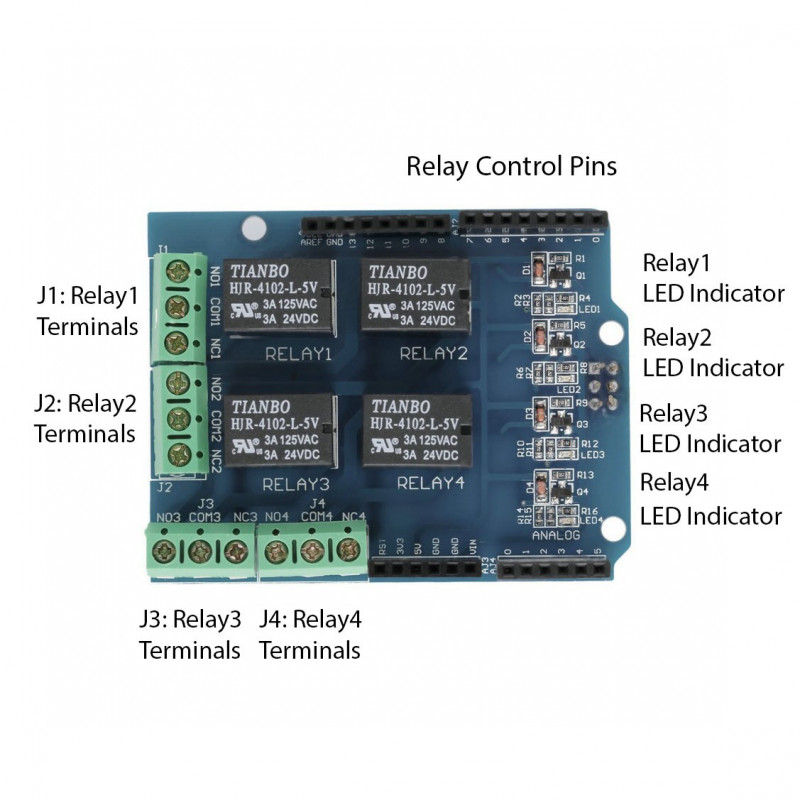
ARDUINO 4 RELAY WITH I/O SHIELD
Description
Features
- Arudino Uno/Leonardo compatible; Other board or microcontroller via jumper cables
- Interface via digital I/O pins 4,5,6, and 7
- Relay screw terminals
- Standardized shield shape and design
- LED working status indicators for each relay
- High quality relays
- COM, NO (Normally Open), and NC (Normally Closed) relay pins for each relay
Specification
Project |
Min |
Typical |
Max |
Unit |
Supply Voltage |
4.75 |
5 |
5.5 |
V |
Power consumption (@ 5V) |
— |
— |
180 |
mA |
Opening and closing times per minute |
— |
— |
30 |
Frequency |
Maximum switching voltage per channel |
125VAC/24VDC |
— |
||
Maximum switching current per channel |
3 |
A |
||
Dimension |
69X54X23 |
mm |
||
Net Weight |
43 |
g |
NOTE: Place 2 layers of electrical tape on the top of the Arduino's usb connector. This will prevent the relay shield from making contact. Do not operate voltage more than 35V DC.
Shield Interface Description
Relay Shield V2.0 terminal connections description
- Digital 4 – controls RELAY4’s COM4 pin (located in J4)
- Digital 5 – controls RELAY3’s COM3 pin (located in J3)
- Digital 6 – controls RELAY2’s COM2 pin (located in J2)
- Digital 7 – controls RELAY1’s COM1 pin (located in J1)
J1 Interface/Terminal Pin Description:
- COM1 (Common Pin) : The relay pin controlled from the digital pin.
- NC1 (Normally Closed): This terminal will be connected to COM1 when the RELAY1 control pin (Digital 7 I/O pin) is set low and disconnected when the RELAY1 control pin is set high.
- NO1 (Normally Open): This terminal will be connected to COM1 when the RELAY1 control pin (Digital 7 I/O pin) is set high and disconnected when the RELAY1 control pin is set low.
Terminals J2-4 are similar to J1 except that they control RELAY2-RELAY4 respectively.
Note: Only four Arduino Digital I/O pins, pins 4-7, are required to control the four different relays. Additionally the 5V and two GND Arduino pins are also required to power up the Relay Shield.