Store address and hours
location_on 4131 Fraser St. Vancouver BC Get Directions
phone 604-875-1993 Call us
access_time Hours
Monday - Friday | 9AM - 5:30PM |
Saturday - Sunday & Holidays | Closed | See Holiday Hours |

-
close
-
CATEGORIES
-
-
-
-
-
-
-
-
-
-
-
-
-
Featured Item
-
-
-
-
-
-
-
more electrical devices
More electrical devices -
more electrical devices
More electrical devices
-
-
more electrical devices
More electrical devices -
more electrical devices
More electrical devices
-
-
Featured Items
-
more electrical devices
More electrical devices
-
-
-
-
-
-
-
-
Featured Item
-
-
-
-
-
-
-
Featured Items
-
-
-
-
-
-
-
-
Featured Items
-
-
-
Featured Items
-
-
-
-
-
-
-
-
-
-
-
Featured Items
-
-
-
-
-
-
-
-
-
Featured Items
-
-
-
-
-
-
featured
-
-
-
Featured Items
-
-
-
-
-
-
-
Featured Items
-
-
-
-
-
Featured Items
-
-
-
-
Featured Products
-
-
-
More Filaments
More Filaments
-
-
-
-
more electrical devices
More electrical devices
-
-
more electrical devices
More electrical devices
-
-
Electrical Devices
-
-
-
more electrical devices
More electrical devices
-
-
-
-
-
-
-
Featured Products
-
-
-
Featured Products
-
-
-
-
BRANDS
-
-
-
-
Brands/Manufacturers
-
-
Manufacturer 3
-
-
- PROJECTS
-
COMMUNITY
-
- SALE Sale
ARDUINO UNO WIFI
Description
Note: This is a Developer Edition board, quantities are limited and once gone we might not have any left. Final edition of this board is still in the making.
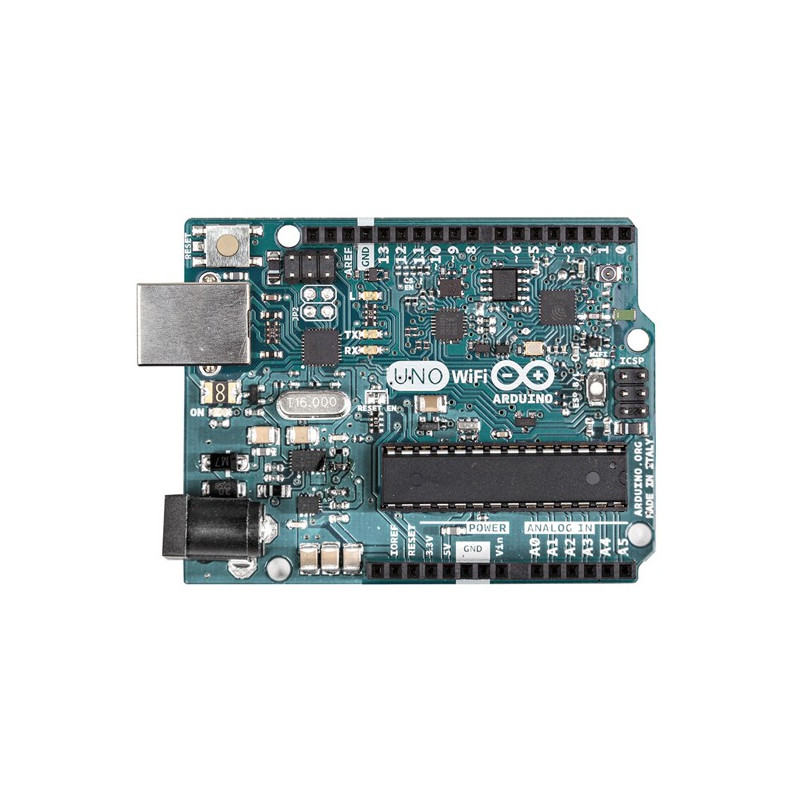
The Arduino Uno Wi-Fi is the new Arduino Uno with an integrated Wi-Fi module! The board is based on the ATmega328P (datasheet) with an ESP8266 Wi-Fi Module integrated (datasheet).
It has 14 digital input/output pins (of which 6 can be used as PWM outputs), 6 analog inputs, a 16 MHz ceramic resonator, a USB connection, a power jack, an ICSP header, and a reset button. It contains everything needed to support the microcontroller; simply connect it to a computer with a USB cable or power it with an AC-to-DC adapter or battery to get started.
The ESP8266 Wi-Fi Module is a self contained SoC with integrated TCP/IP protocol stack that can give access to your Wi-Fi network. (Or the device can act as an access point.) One useful feature of Uno Wi-Fi is support for OTA (over-the-air) programming, either for transfer of Arduino sketches or Wi-Fi firmware.
Summary
Arduino Microcontroller |
|
Microcontroller |
ATmega328 |
Architecture |
AVR |
Operating Voltage |
5 V |
Flash Memory |
32 KB |
SRAM |
2 KB |
Clock Speed |
16 MHz |
Digital I/O Pins |
14, with 6 PWM and UART |
Analog Input Pins |
6 |
EEPROM |
1 KB |
DC Current per I/0 |
40 mA |
Microprocessor |
|
Processor |
ESP8266 |
Architecture |
Tensilica Xtensa LX106 |
Operating Voltage |
3.3 V |
Flash Memory |
4 MB |
RAM |
8 MB instruction, 12 MB data |
Clock Speed |
80 MHz |
WiFi |
802.11 b/g/n 2.4 GHz |
Wake up time | < 2 ms |
General |
|
Input Voltage | 5-12 V |
Power Consumption | 130 mA (sleepmode 80 mA) |
PCB size | 53 x 68.5 mm |
Weight | 0.028 Kg |
Product Code | A000133 |
Schematics & Reference Design
Power
External (non-USB) power can come either from an AC-to-DC adapter (wall-wart) or battery. The adapter can be connected by plugging a 2.1mm center-positive plug into the board's power jack. Leads from a battery can be inserted in the Gnd and Vin pin headers of the POWER connector.
The board can operate on an external supply of 6 to 20 volts. If supplied with less than 7V, however, the 5V pin may supply less than five volts and the board may be unstable. If using more than 12V, the voltage regulator may overheat and damage the board. The recommended range is 7 to 12 volts.
- VIN. The input voltage to the Arduino board when it's using an external power source (as opposed to 5 volts from the USB connection or other regulated power source). You can supply voltage through this pin, or, if supplying voltage via the power jack, access it through this pin.
- 5V. This pin outputs a regulated 5V from the regulator on the board. The board can be supplied with power either from the DC power jack (7 - 12V), the USB connector (5V), or the VIN pin of the board (7-12V). Supplying voltage via the 5V or 3.3V pins bypasses the regulator, and can damage your board. We don't advise it.
- 3V3. A 3.3 volt supply generated by the on-board regulator. Maximum current draw is 1 A (according to the power input source).
- GND. Ground pins.
- IOREF. This pin on the Arduino board provides the voltage reference with which the microcontroller operates. A properly configured shield can read the IOREF pin voltage and select the appropriate power source or enable voltage translators on the outputs for working with the 5V or 3.3V supplies.
Memory
Input and Output
Each of the 14 digital pins on the Uno can be used as an input or output, using pinMode(), digitalWrite() and digitalRead() functions. They operate at 5 volts. Each pin can provide or receive a maximum of 40 mA and has an internal pull-up resistor (disconnected by default) of 20-50 kOhms. In addition, some pins have specialised functions:
- Serial: 0 (RX) and 1 (TX). Used to receive (RX) and transmit (TX) TTL serial data. These pins are connected to the corresponding pins of the ATmega8U2 USB-to-TTL Serial chip.
- External Interrupts: 2 and 3. These pins can be configured to trigger an interrupt on a low value, a rising or falling edge, or a change in value. See the attachInterrupt() function for details.
- PWM: 3, 5, 6, 9, 10 and 11. Provide 8-bit PWM output with the analogWrite() function.
- SPI: 10 (SS), 11 (MOSI), 12 (MISO), 13 (SCK). These pins support SPI communication using the SPI library.
- LED: 13. There is a built-in LED connected to digital pin 13. When the pin is HIGH value, the LED is on, when the pin is LOW, it's off. The Uno has 6 analog inputs, labeled A0 through A5, each of which provide 10 bits of resolution (i.e. 1024 different values). By default they measure from ground to 5 volts, though is it possible to change the upper end of their range using the AREF pin and the analogReference() function. Additionally, some pins have specialized functionality:
- TWI: A4 or SDA pin and A5 or SCL pin. Support TWI communication using the Wire library. NOTE: the A4 or SDA pin and A5 or SCL pin are in use by the IO Expander SC16IS750IBS. There are a couple of other pins on the board:
- AREF. Reference voltage for the analog inputs. Used with analogReference().
- RESET. Bring this line LOW to reset the microcontroller. Typically used to add a reset button to shields which block the one on the board.
Communication
Programming
Automatic (software) Reset
USB Overcurrent Protection
Physical Characteristics
Product Code