

location_on 4131 Fraser St. Vancouver BC Get Directions
phone 604-875-1993 Call us
access_time Hours
| Monday - Friday | 9AM - 5:30PM |
| Saturday - Sunday & Holidays | Closed | See Holiday Hours |



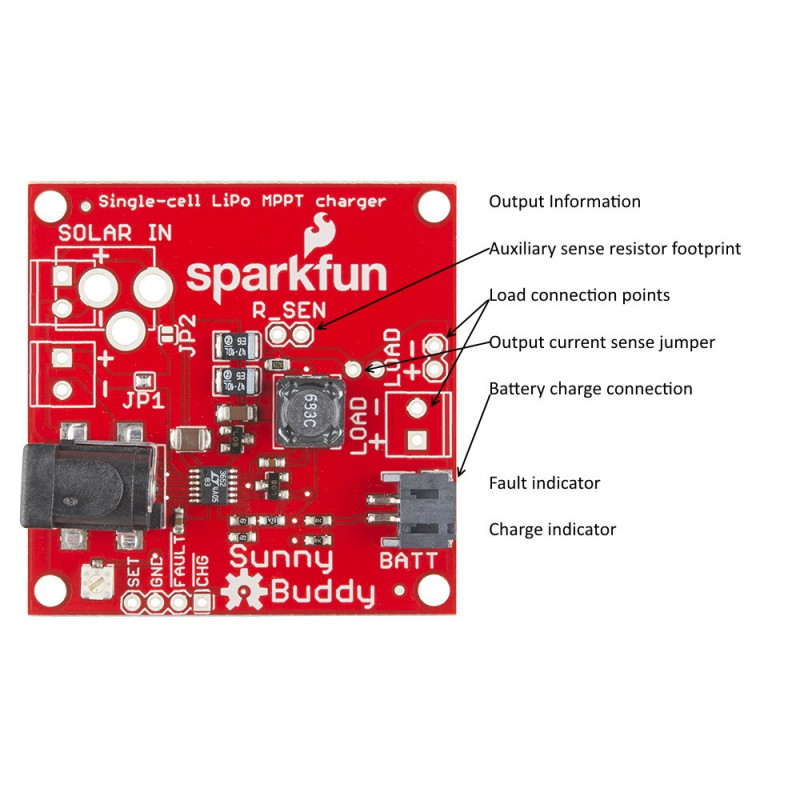
This is the Sunny Buddy, a maximum power point tracking (MPPT) solar charger for single-cell LiPo batteries. This MPPT solar charger provide you with the ability to get the most possible power out of your solar panel or other photovoltaic device and into a rechargable LiPo battery. Set-up is easy as well, just plug your solar panel into one side of the Sunny Buddy and your battery into the other and you are good to start charging!
The output of the Sunny Buddy is intended to charge a single polymer lithium ion cell. The load should be connected in parallel with the battery. By default, the Sunny Buddy comes set to a maximum charge current of 450mA with a maximum recommended input of 20V (minimum 6V). It’s recommended that batteries not be charged at greater than their capacity rating; thus, the smallest battery that should be charged with the Sunny Buddy is 450mAh.
Each Sunny Buddy comes equipped with a LT3652 power tracking 2A battery charging circuit and pre-installed barrel jack and 2-pin JST connectors with unpopulated areas to install your own personal 3.5mm screw terminals for added input/output options. This revision also adds a potentiometer to the input to set the holding voltage for MPPT and we've also tweeked the feedback resistors on the output to change the float voltage.
The Sunny Buddy is a maximum power point transfer (MPPT) solar charger. Why does that matter? What makes it worth having in a circuit? The answers lay ahead.
Battery charging is a current dependent action, not a voltage dependent action. Battery chargers monitor the current flowing into the battery and limit it to some set value, chosen to prevent damage to the battery. An ideal battery charger will provide as much current to the battery as it is capable of drawing from its power supply, but no more than the battery can handle.
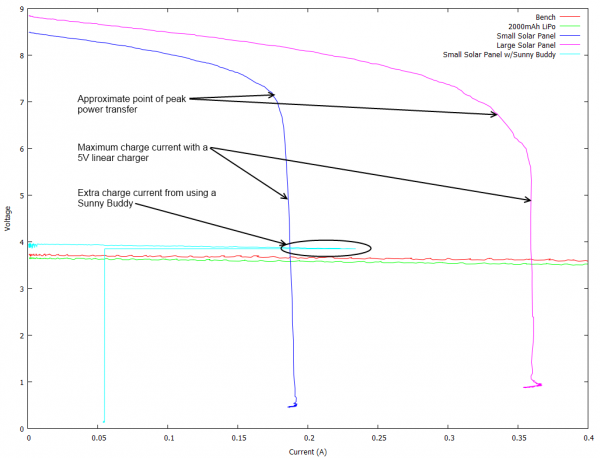
Consider the first part of that last sentence: "as much current as it is capable of drawing from its power supply." I've collected some data from five different power supplies: a 2000 mAh LiPo battery, a bench supply, our small solar cell, our large solar cell, and the Sunny Buddy attached to the small cell in full Colorado sunlight (albeit in midwinter).
The chart compares output voltage versus load current for the five sources listed above: in short, how much current each is capable of providing. For a sort of baseline comparison, note that the output of the bench supply, the battery, and the Sunny Buddy are pretty flat. You can clearly see the point at about 240mA where the Sunny Buddy could no longer safely draw more current from the solar cell. In a charging application, that's the point at which it would have settled in and charged the battery. Since I was actively increasing the load to stress the supplies, it folded back to a lower voltage to gracefully handle the excessive load without bursting into flames.
The solar cells, however, behave quite differently. They slowly droop until they reach a certain point, then decline increasingly rapidly until even a small increase in current draw causes the output voltage to plummet. There's a point on that curve, in the "knee" region, where the power transferred to the load is at its peak. This point, called the maximum power point, is crucial to squeezing the most efficiency out of a solar cell.
Finding that point is the key here. The solar cell curves will be compressed along the X-axis in lower light conditions, and, while the unloaded voltage may remain quite high even in low light, the amount of current which can be drawn from the cell decreases rapidly with the amount of light available.
The Sunny Buddy locks in on that point in the curve, pulling the maximum current the cell will provide, but no more, and turning it into charge current. The circled region of the graph shows this: the highest current the small solar cell can deliver is around 180mA, but the Sunny Buddy pushes out 240mA before entering current limit. That's an extra 33% more charge current available to your battery over a comparable 5V charger.
Efficiency in any power supply system can be said to be the ratio of power out to power in. This is another place where the Sunny Buddy is better than comparable linear solutions.
The Sunny Buddy is a switching supply; the output power is given by the equation Pout = Pin * Efficiency. The Sunny Buddy's efficiency has repeatedly measured to be about 80% in tests.
Let's consider a linear solution. To avoid getting too far into that steep region of the graph, we'll set our charge current at 160mA. To calculate the output efficiency, we divided the output power by the input power. Looking at the voltage on the solar cell curve, we see that for 160mA the output voltage is about 7V; thus, input power is 7V * 160mA = 1142mW. Output power is 4.2V * 160mA = 672mW. That's the approximate charge voltage times the charge current. Efficiency is power in over power out: 672/1142 = 59%. Best case, that's the percentage of the electric power generated by the cell that you're using. It will actually be lower when the cell voltage is lower than 4.2V, which it will be over most of the charging range.
Here, again, Sunny Buddy wins: it's using (at least) 20% more of the available power from the solar cell.
But what happens to our linear charge circuit when the sun goes behind a cloud? As I mentioned earlier, as available solar energy decreases, the graph compresses along the X-axis. If that steep region drops below the set current of our charger, things go pear-shaped fast. The available voltage plummets, and the charger stops working.
We can combat that by either setting a lower charge current in the first place, which isn't ideal because it means on a good, sunny day, you're losing a lot of potential solar energy by not loading the solar cell heavily enough, or by servoing our charge current to the voltage, reducing or increasing it based on the cell voltage. While that may sound simple, in practice it's quite complex.
The Sunny Buddy does just that: it monitors the cell voltage and stops drawing current when the voltage droop indicates the cell is being pushed a little too far. Furthermore, since the Sunny Buddy uses a switching topology rather than a linear topology, it has a better efficiency than any linear solution can provide.
There are three parts to consider when embedding the Sunny Buddy into a project:

