


All pictures are for illustrative purposes only.
This item has been retired.
Note: The relay outputs are passive contact, just a switch
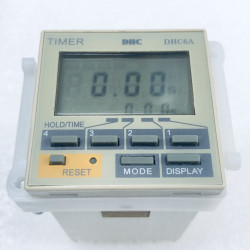
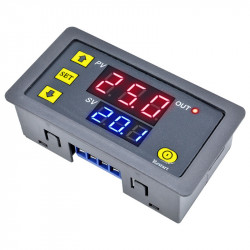
Hold the Set button until P## shows up. Then you can select the program mode with the up/down buttons.
| Mode | Operation | Description |
| P1 | Trigger signal, the relay is on for "OP" time, and then disconnects; during the "OP" time, if the signal is triggered again, | |
| P1.1 | Timer - Ignore | signal is triggered again, invalid |
| P1.2 | Timer - Restart | signal is triggered again, the clock is reset and restarts counting down to 0 seconds |
| P1.3 | Timer - Off | signal trigger again, relay is turned off, stop the clock |
| P-2 | Delay | trigger signal, Delay for "CL" time and turn on for "OP" time.. |
| P3.1 | Loop | Trigger turns the relay for "OP" time, the relay off "CL" time, then this is repeated for LOP times., if the trigger signal period, the relay off, stop the clock; the number of cycles ("LOP") can be set. |
| P3.2 | Loop - Ignore | The relay is on for "OP" time, then the relay is off for "CL" time. This repeats for ("LOP") times. Trigger signals are ignored. |
| P-4 | Hold | Signal holding function. If there is a trigger signal, the timer is reset. when the signal disappears, counts down for "OP" time before turning the relay off; If another signal is detected, the timer is reset. |
0.1seconds(min) to 999min(max) continuously adjustable.
After setting the mode selection screen parameter value by a short press "STOP" button to select the time range;
XX. X decimal point in decade place, time range: 0.1 seconds to 99.9 seconds.
XXX. decimal point in the unit place, time range: 1 second to 999 seconds.
X. X. X. decimal point in all places, timing range: 1 minute to 999 minutes.
Example: You want to set "OP" to 3.2 seconds, then move the decimal point to decade place, the digital display 03.2
"OP" - conduction time
"CL" - off time
"LOP" - number of cycles (1-999times; "---" represents infinite loop)
These parameters are independent of each other, but is shared by each mode.
Example: P1.1 mode, set on-time "OP" to 5 seconds, if you switch to P1.2 mode, it's "OP" will be 5 seconds too.
In the main interface (display 000), short press "SET" button will display "OP" ("CL", "LOP") and the corresponding time XXX;
Some parameters only mode "OP" (such as the mode P1.1, P1.2, P1.3), short press the "SET" key to display only the "OP" and the corresponding time;
Some models have parameters "OP", "CL", "LOP" (such as the mode P3.1, P3.2), short press "SET" button will display "OP" and the corresponding time, "CL" and the corresponding time, "LOP" and the corresponding number of times;
In the main interface short press "SET" key to see information about the parameter of the current mode, very convenient!
The main interface: In the relay does not work status display "000" (no decimal point), with decimal point under relay state.
Mode selection screen: Long press the "SET" key to enter, after setting is completed, long press "SET" key to exit back to main screen.
Relay enable mode:
In the main interface, short press the "STOP" button to switch between ON and OFF, the current in which the state will flash, and then return to the main screen. This feature is an emergency stop function, click off the relay.
Hold the Stop button for a few seconds to toggle between these modes
O-d : Display stays on
C-P : Display turns off after 5 minutes.